Pages

Monday, January 16, 2012

Cooking Magic: Chicken and Dumplings


There was magic in my kitchen, today.

Aside from the fact that I had Disney on my mind, I felt there was something special going on.

It's been a frigid weekend out here in the northeast, and logically, the heat in our apartment starts acting shotty. Pair that with this week's cooking challenge (soup), and the decision to make Chicken and Dumplings was a no-brainer.

The recipe begins with searing the chicken thighs until they are golden brown on both sides. Here and there I advise you to sneak bits of the deliciously crispy, golden brown skin. Magic! After pan frying three batches of three thighs each, the bottom of the pan starts to look very messy. How are all of those browned bits ever going to unstick from the bottom? Then comes the butter, onions, leeks and celery; the stuck bits are no more! Magic.

And the dumplings? Don't even get me started on those. Each one is a little nugget of magic.

The way this dish warms up the home, the way it warms up your heart, the way it warms up your whole inner being? All magic.


Chicken and Dumplings
by Smitten Kitchen

*The only change I made was adding three stalks of chopped celery with the leeks and the onions.


Enjoy!

Sunday, January 15, 2012

Mini Whoopie Pies


Whoopie pies are completely unfamiliar to me. I had first heard about them years ago, when I followed How To Eat A Cupcake. I was still in my cupcake phase, so I never tried branching out to any of her other recipes, but these always stayed in the back of my mind.

I was eager to try them this week though, after the baking challenge asked we make something "miniature". Aside from the marshmallow cream, (or should I say creme?), the ingredients were all things I already had on hand. The process was very simple, and the feedback was all positive.

Mini Whoopie Pies
Adapted from Real Food for Healthy Kids via Epicurious

Cake:
  • 2 cups unbleached all-purpose flour
  • 1/2 cup unsweetened cocoa
  • 1/2 teaspoon baking soda
  • 1/2 teaspoon salt
  • 1 stick unsalted butter, at room temperature
  • 1 cup granulated sugar
  • 1 large egg
  • 1 cup milk
Filling:
  • 1 stick unsalted butter, softened
  • 2 cups powdered sugar
  • 1/2 teaspoon vanilla extract
  • 7 oz. jar marshmallow creme

Arrange the oven racks in the upper and lower thirds of the oven and preheat the oven to 425°F. Line 2 large baking sheets with parchment paper.

Make the cakes:
Whisk together the flour, cocoa, baking soda and salt in a medium bowl.

Cream the butter and sugar in a large bowl until fluffy, about 4 minutes. Add the egg and beat at medium speed until incorporated. At low speed, add the flour mixture in 2 batches, alternating with the milk, mixing until just blended.

Using a pastry bag, drop 18 generous teaspoons of batter onto each sheet, leaving about 2 inches between cakes. Bake the 2 sheets together for 5 to 7 minutes, until cakes are springy to touch. Let cool on the sheets for 5 minutes, and transfer to racks to cool completely. Change the parchment and repeat using the remaining batter (about 72 cakes in total).

Make filling:
Beat the butter and powdered sugar until fluffy, about 5 minutes. Add the vanilla and marshmallow creme and mix until blended, about 1 minute.

Match pairs of cake of the same shapes/sizes and use pastry bag to dollup the bottom side of 1 cake with filling and sandwich together with the other cake.

(Store the finished whoopee pies in a covered plastic container and chill for up to 3 days.)

Saturday, January 14, 2012

General Tso's Chicken

When I'm not cooking/baking/thinking about food, I work as a third grade teacher about 20 miles outside of the city. It's a tiny school, so teachers and students have lunch together, "family style". Each table has about one adult to a group of about 7 students. While I've been amazed at the eating habits of our students, (some that come to mind include one child who only wanted to eat peas for lunch, another who alternated bites of meatballs with bites of italian ice), some of my students pay close attention to my habits as well.

I don't think of myself as a strange eater, but my students are often surprised by how often I consume spicy foods. "You put hot sauce in your clam chowder?!" (Try it, I swear it's delicious!) I never thought too much of it, until I started making foods at home that were too spicy for the boyfriend. This recipe falls into this category.

This week's challenge was to cook a Chinese recipe. While I don't expect the recipe to be very authentic, I really liked the chicken's crunch and the consistency of the sauce. Depending on how much chicken you're making, and the size of the pan you're frying in, the recipe can take quite some time. It was a late dinner for us, and only to find out from the boyfriend that it was "too hot to taste" Womp, womp.

I'm sharing my recipe anyways, considering the fact that I made some adaptations to the original recipe (found here), which could again be altered for a lower spice tolerance. I think where I went wrong was since I was using 2.5 times as much chicken, I thought that required 2.5 times the amount of red chili peppers......nope!

General Tso’s Chicken

Ingredients:
-
2.5 pound boneless, skinless chicken breasts, sliced into 1-inch cubes
- 2 cups cornstarch
- 1/3 cup salt
- 6 teaspoon freshly ground black pepper
- vegetable oil for frying, plus 2 tablespoon for stir-frying
- 10 dried red chilis, roughly chopped
- 2 tsp minced garlic
- Scallions, green parts thinly sliced, for garnish

(Marinade)
- 2 1/2 tablespoons soy sauce
- 1 tablespoon red wine vinegar
- 3 egg whites

In a large bowl, combine the soy sauce, vinegar, and egg whites. Coat the chopped chicken in the marinade mixture and let sit for 10 minutes.

(Sauce)
- 5 oz chicken stock or broth
- 3 tablespoons tomato sauce
- 3 tablespoons sweet soy sauce
- 3 tablespoons rice vinegar
- 3 teaspoons hoisin sauce
- 1 teaspoon cayenne
- 2 crushed red peppers
- 1 tablespoon sesame oil
- 1 1/2 tablespoons sugar
- 2 1/2 teaspoons cornstarch

In a small bowl, combine the chicken stock, tomato sauce, sugar, sweet soy sauce, rice vinegar, hoisin sauce, chili powder, peppers, sesame oil, and the 1 teaspoon of cornstarch. Stir until well combined. Set aside.

Steps:
(1) In a large ziploc bag, mix the cornstarch with salt and pepper. Add the marinated chicken and toss to coat. Shake off any excess before frying.
(2) In a large thick-bottom pan, heat vegetable oil on high until it begins to bubble and sizzle/pop. Turn heat down to medium, and start frying your chicken.
(3) Working in multiple batches, add the first batch of chicken pieces (about 8 per batch) and fry until golden brown on the outside and cooked through, about 3-5 minutes. Remove the chicken with a slotted spoon and drain on paper towels. Repeat until all your chicken is cooked.
(4) Turn stove off, discard the oil.
(5) Reheat the pan with 2 tablespoons of oil over medium-high heat. Add the chopped dried chilis and garlic, and stir-fry until just fragrant, about 20 seconds.
(6) Pour in the sauce, add remaining cornstarch, and stir until it begins to simmer and thicken, about 1 to 2 minutes.
(7) Add fried chicken to the pan and coat with sauce. Turn off stove, and transfer chicken to a serving dish.
(8) Garnish with chopped scallions. Serve with white rice and vegetables.

Saturday, January 7, 2012

Chocolate Peppermint Brownies


In my last post, I mentioned that I'm participating in a 52 week cooking challenge. I also decided to participate in the 52 weeks of baking challenge. It follows a similar format to the cooking challenge, and gives me a chance to bake with specific ingredients or themes in mind. This week's baking challenge is brownies.

Initially, I wanted to fall back on a chocolate/peanut butter recipe, but decided to push myself to try something new. I had never worked with peppermint before, (except for a batch of cupcakes I was making, which resulted in shattered candy canes EVERYWHERE), so I chose a recipe I had favorited a while back.

Even though the brownies bake for only 20 min, the recipe requires quite a bit of patience. Each portion of the brownie requires cooling, and the complete product needs to cool for 2 hours. This is definitely a recipe you want to start earlier in the day.


Grasshopper Brownies
Adapted from Smitten Kitchen

Brownie

1 1/2 sticks unsalted butter
10 1/2 oz semisweet chocolate chips
1 1/2 cups packed light brown sugar
3 large eggs, lightly beaten
1 1/4 teaspoons vanilla
3/4 cup all-purpose flour
1/4 cup plus 2 tablespoons unsweetened cocoa powder
3/4 teaspoon salt

For mint ganache
1/4 cup heavy cream
10 oz white chocolate chips
1 teaspoon peppermint extract

For chocolate ganache
1/2 cup heavy cream
10 oz semisweet chocolate chips

Make brownies:
Preheat oven to 375°F. Line a 13- by 9-inch baking pan with 2 sheets of foil, (one in each direction) leaving overhang on all sides. Spray foil with a nonstick spray.

Melt butter and chocolate with brown sugar in a medium saucepan over moderate heat, stirring occasionally, until smooth. Remove from heat. Whisk in eggs and vanilla until combined. Whisk in flour, cocoa, and salt until just combined.

Spread batter evenly in baking pan and bake until set, (a toothpick inserted in center should comes out with moist crumbs), about 20 minutes. Cool completely in pan on a rack, about 1 1/2 hours.

Make mint ganache:
In a small saucepan, over medium hear, melt white chocolate with the heavy cream. Whisk until smooth, remove from heat. Stir in peppermint extract and chill, covered, stirring occasionally, until thick, about 1 hour.

Make chocolate ganache:
In a small saucepan, over medium heat, melt chocolate together with the heavy cream. Whisk until smooth. Remove from heat, chill, covered, stirring occasionally, until thick, about 30 minutes.

Assemble layers:
Spread mint ganache over top of cooled brownie in a thin even layer using a spatula to evenly distribute. Chill until firm but still slightly sticky, about 30 minutes.

Spread chocolate ganache over mint and chill about 2 hours.

Lift brownies out of pan. Cut dessert into squares and peel from foil.

Friday, January 6, 2012

Shakshuka


New Year! New recipes, and as a result new blog posts.

Throughout 2012, I'll be participating in reddit's 52 Weeks of Cooking challenge. Every week, I'll write about a recipe that features a specific ingredient, dish type, theme, or cooking technique. I'm also participating in the 52 Weeks of Baking challenge which follows a similar format.

As part of Week 1 in the challenge, (ingredient: eggs), I set out to make Shakshuka. A somewhat recent favorite in the dinner rotation, Shakshuka is eggs poached in a spicy tomato sauce. You may be glad to hear that the amount of spice can be controlled in case you aren't a fan of steam coming out of your ears. (Or of runny noses, teary eyes, etc). I've been putting hot sauce/red pepper flakes on about 90% of my meals, but I still believe the spice is very tolerable in the recipe below. Feel free to drop the number of peppers if you are worried.


Shakshuka
Adapted from Smitten Kitchen
1/4 cup olive oil
3 stalks of celery, chopped
5 Anaheim chiles stemmed, seeded, and finely chopped
1 small yellow onion, chopped
5 cloves garlic, chopped
1 teaspoon ground cumin
1 tablespoon paprika
2 14.5-ounce can petite diced tomatoes, undrained
Kosher salt, to taste
6 eggs
1/2 cup blue cheese, crumbled
1 tablespoon chopped flat-leaf parsley
Heat oil in a 12-inch pan over medium-high heat. Add chopped celery and cook for 5 minutes. Occasionally, give the chopped vegetables a stir. Add chiles and onions and cook until soft, about 6 minutes. Add garlic, cumin, and paprika, and cook, stirring frequently about 1 minute.
Add tomatoes to pan, along with 1/2 cup water, reduce heat to medium, and simmer, stirring occasionally, about 15 minutes. Season sauce with salt.
Crack eggs over sauce, evenly distributed across sauce’s surface. Cover pan and cook until yolks are just set, about 5 minutes. Remove from hear, baste the whites of the eggs with tomato sauce, being careful not to disturb the yolk. Sprinkle cheese and parsley over Shakshuka before serving.

Serve over rice pilaf and enjoy!

Thursday, November 4, 2010

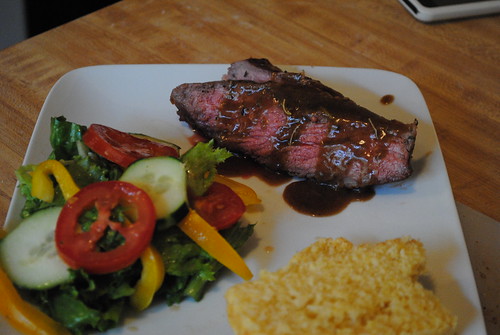
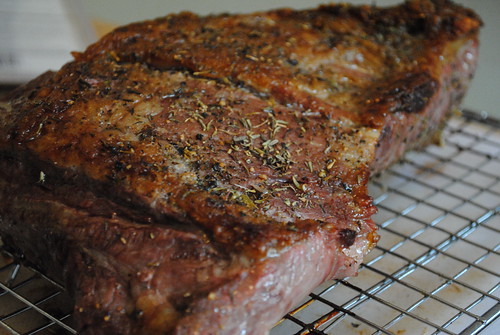
Garlic and Herb Sirloin Roast with Guinness Gravy

One thing about our house is that we are very carnivorous. Ben's not a fan of cooked vegetables, and sometimes I think raw veggies are pretty boring, so we end up making hamburgers more often than we should, and salad doesn't happen enough.

I was running out of dinner ideas when I noticed my local grocery store ad. Tri tip roasts were on sale, and all I could think of was a delicious slow cooked roast my mom had made, with carrots and potatoes...

I picked up a 2.5 lb roast, a roast pan, meat thermometer, and pulled out my copy of The Joy of Cooking. While this isn't the same roast that my memory salivated for, it is definitely a delicious meal.

Garlic-and-herb Studded Sirloin Roast
adapted from The Joy of Cooking

1 boneless tri tip roast (between 1 and 3lbs)
2 large garlic cloves, thinly slivered
1 1/2 teaspoons dried thyme
1 1/2 teaspoons salt
1 teaspoon ground black pepper

1. Toss slivered garlic with thyme, salt, pepper.
2. Make slits in the roast and insert seasoned garlic slivers.
3. Rub the reamaining seasonings over the meat, then marinate the meat, covered, between 30 min and 2 hrs at room temperature or up to 24 hrs in the refrigerator.

Preheat oven at 425 degrees (F)
4. Roast beef in oven until internal temperature is 120-125 degree (F) for medium-rare.
(between 10 and 20 minutes per pound)
5. Remove meat to a platter, cover loosely with aluminum foil and let stand for 15-20 minutes before carving.
6. Carve roast into 1/8-in to 1/2-in slices.

Guinness Pan Gravy
adapted from The Joy of Cooking's "Pan Gravy for Meat"

2 tablespoons reserved fat from roasting pan
1-2 tablespoon AP flour
1 cup Guinness
Dried thyme, rosemary
Salt
Ground pepper
1 tablespoon butter

1. After pouring and reserving far from the roasting pan, place roasting pan on a burner over medium heat.
2. Pour in reserved fat and stir in all-purpose flour.
3. Cook, whisking or stirring constantly and scraping up browned bits from bottom and sides of pan, for several minutes to remove raw taste of flour and smooth the mixture.
4. Add Guinness, herbs, salt and pepper to taste.
5. Cook, whisking of stirring, until slightly thickened.
6. Swirl in butter and continue cooking to desired consistency.

We enjoyed our gravy-topped roast with a side salad and a piece of corn bread.

Monday, November 1, 2010

Pizza!


I love foods that are bad for me. I'm crazy for sweets (ice-cream, candy), and cheesy, carb-y foods (burgers, chinese); therefore, it was pretty bad when I found out how EASY it was to make my own pizza. If I make it myself then it has to be better for me than the other stuff, right?

So I was living the dream when I put together two of these pizzas. Dough and sauce both made from scratch. I don't have a recipe for the sauce yet, (they were meatballs gone awry, but since they didn't hold their shape, it was basically a meaty marinara sauce).

I thought I'd share my pizza dough recipe.

Olive Oil Dough
From Artisan Bread in Five Minutes a Day
Great book that I bought from Amazon, which I highly recommend.
*Makes four 1-pound loaves. (For myself, 2 large pizzas) Recipe easily doubled or halved.

2 3/4 cups lukewarm water
1 1/2 tablespoo
ns granulated yeast (2 packets)
1 1/2 tablespoons Kosher salt
1 tablespoon sugar
1/4 cup extra virgin olive oil
6 1/2 cups unbleached, all-purpose flour (and for you more disciplined eaters, this could easily be substituted for all-purpose whole-wheat flours)

1. Mix the yeast, salt, sugar, and olive oil with the water in a 5-qt bowl, or a lidded (not airtight) food container.

2. Mix in the flour without kneading, using a spoon, 14-cup capacity food processor (with dough hook), or using a heavy-duty stand mixer (again, with dough hook). If you're not using a machine, (like myself), I combined the flour by stirring with a spoon. You may also need to use very wet hands to incorporate the last bit of flour.

3. Cover (without an airtight seal), and allow to rest at room temperature until dough rises and collapses (or flattens on top), approximately 2 hours.

4. After this initial rise, the dough can be used right away. Some prefer to handle the dough when after refrigeration. Refrigerate in a lidded (not airtight) container and use over the next 12 days.

Three Meat Pizza
My own creation, using baking directions from Artisan Bread in 5 as a guide.

About 2-lb of refrigerated pre-mixed dough
3/4 cup Marinara Sauce with ground beef
12 oz. Spicy Italian Chicken Sausage (I used a pack from Trader Joe's that comes with 5)
1 small package of Pepperoni
1/4 lb sliced Mozzarella cheese
1/2 cup grated Parmigiano-Reggiano cheese, (Parmesan, or any other italian cheese blend works well, too)

1. Twenty minutes before baking time, preheat oven with a baking stone at 550 degrees (F). Or Your oven's maximum temp if it doesn't reach 550.

2. Prepare and measure all the toppings in advanced, (slicing sausage, cheese, grating parmesan, and if you're bold cooking vegetables).

3. Dust the surface of the refrigerated dough with flour and cut off a 2-lb piece. Dust the piece with more flour and quickly shape into a ball by stretching the surface of the dough around to the bottom on all four sides, rotating the ball a quarter-turn as you go.

4. Flatten the dough with your hands and a rolling pin on a wooden board to produce a 1/4-in thick round, dust with flour to keep dough from sticking to the rolling pin or the board. Don't overuse flour, consider a dough scraper to "unstick" dough from the board. You may also need to let the partially-rolled dough sit for a few minutes to "relax" to allow further rolling. At this point, stretching by hand may help, followed by additional rolling. Place the rolled-out dough onto a liberally cornmeal covered-pizza peel.

5. Distribute the sauce over the surface of the dough. Do not cover the dough thickly; leave some of the dough surface exposed.


6. Scatter Mozzarella over the surface of the dough, then the Parmigiano-Reggiano cheese, sausage, and pepperoni. No further resting required before baking.


7. Slide the pizza directly onto the stone. Check for doneness in 8-10 minutes; at this time turn the pizza around in the oven if one side is browning faster than the other. It may need up to 5 more minutes in the oven.